
Sections
The whole point is to help people who want to ride bikes to do so comfortably, safely, and effectively. This HTML version makes things easier by allowing diagrams, which are being slowly created and added. Your suggestions and feedback can help guide this evolution to make All About Bikes better and more useful. Please send them to me at wblock@wonkity.com.
Buying a used bike can be tricky, like buying a used car. A cyclist friend can help, or books like Tom Cuthbertson's Anybody's Bike Book can teach you repair and maintenance; check the library.
It's possible to find real bargains this way. The price on a quality older bike may be so low (less than US$50, say) that it's hard for it to not be a good deal. Check yard sales and newspaper classified ads. Don't reject an otherwise good bike just because it has the wrong type of handlebars. Bike shops or home mechanics can switch the handlebars from "drop" bars to flat "upright" bars. But don't decide against drop bars unless you've found you don't like them after riding a bike that's large enough for you. Many people first experience drop bars on bikes that were much too small for the rider, making for a back-hunching experience that wasn't really the fault of the handlebars.
The bottom range for a new, dependable mountain or hybrid-type bike starts at about US$200. Around that price range, quality will be similar between the many different brands. However, frame styles and sizing will vary, so you should ride several bikes before deciding. Go to the local bike shops and try them out. Take your time, and compare as many different bikes as possible. If possible, shop in the off season, middle or late winter.
It always comes up, so let's talk about cheap bikes. Many people call them department-store bikes, because that's where they are found, often in the toy section. They're cheap, but cheap is not the same as inexpensive. What's wrong with this kind of bike? Here goes:
Safety: most cheap bikes have low-quality, ineffective brakes and other parts. Steel rims are usually standard equipment, and they become icy-slick when wet, making braking even worse. That tiny trickle of water running across the road may have eliminated your ability to stop.
Some people try to duck the safety issue by not going very fast. The problem is that a bike doesn't need to be going fast for a braking or part failure to endanger the rider, as anyone who's coasted toward an intersection while frantically applying the brakes will be happy to verify.
Durability: according to the manufacturers, the average department-store bike has a planned lifetime of 75 miles. The design can cut corners because it doesn't have to last. If you have a three-mile commute to work or the grocery store, the bike will have exceeded its planned life after only thirteen days of use.
 Maintainability:
the components used in the drivetrain and elsewhere are difficult to adjust
and often can't be replaced with more effective and reliable "serious"
bike parts. An easy way to tell if a certain bike has cheap bike components
is to look at the bottom bracket, the central part in the frame where the
pedals and cranks are attached. Cheap bikes have one-piece cranks, and
the bottom bracket is huge (about a 3-inch diameter cylinder) so the cranks
can be threaded through ring assembly. Good bikes have separate cotterless
cranks that bolt onto a center axle, so the bottom bracket is a small cylinder,
about 1 to 1-1/2 inches in diameter.
Maintainability:
the components used in the drivetrain and elsewhere are difficult to adjust
and often can't be replaced with more effective and reliable "serious"
bike parts. An easy way to tell if a certain bike has cheap bike components
is to look at the bottom bracket, the central part in the frame where the
pedals and cranks are attached. Cheap bikes have one-piece cranks, and
the bottom bracket is huge (about a 3-inch diameter cylinder) so the cranks
can be threaded through ring assembly. Good bikes have separate cotterless
cranks that bolt onto a center axle, so the bottom bracket is a small cylinder,
about 1 to 1-1/2 inches in diameter.
Comfort: cheap bikes usually come in one size. This size manages to be both too small for many men and too large for many women. Besides the discomfort this creates, an ill-fitting bike is hard to control and not very safe. A standard cheap bike bonus is the narrow, metal or plastic-shelled, thinly padded, and amazingly uncomfortable saddle.
Summing up:
Mass-market saddles are usually composed of a plastic shell which forms the basic shape. Padding, such as it is, covers the shell and is held in place with a thin cover of plastic or vinyl. Most current saddles fall into three types:
There are narrow and wide versions, men's and women's, and models with springs. Before you snicker at that, consider the popularity of suspension (sprung) seatposts. A Brooks saddle with springs like the Conquest may be no heavier than the combination of an ultralight saddle and a suspension seatpost, and will almost certainly be much more comfortable.
Where do you get Brooks saddles? Well, not from most bike shops. They're relatively heavy, and look "retro" rather than high-tech, so mail order is the most common option. I've dealt with Bill Laine (aka Wallingford Bike Parts) several times, and can recommend him. He has a six-month return guarantee, so you don't have to worry about getting stuck with a saddle you don't like. A few people find Brooks saddles uncomfortable, but this is unusual.
If you find any kind of saddle that fits and is comfortable for hours on end, ride it and ignore what anybody else may tell you, including me.
Some traditionalists dislike recumbents, usually because of hearsay instead of riding experience, and lots of myths have grown up around these bikes. It's only recently that high-quality recumbents have become more affordable and more commonplace, and the myths are being rapidly dispelled by firsthand knowledge.
The biggest myth is that recumbents are too low to the ground and won't be seen. In fact, most are not very low, with seats at least twenty inches above the ground, placing the rider's head at or above eye-level with people in cars. Recumbents are unusual enough that drivers see them immediately, much more so than standard bikes. Motorists regard anything unusual as a possible threat, and are very cautious around such objects, adding to the safety factor.
"Is it hard to ride?" (I hear that all the time. No, most are no harder to ride than a standard bike. Some are easier.)
"That looks like fun!" (A lot of women say this with surprise, as if they'd never thought riding a bike could be fun. Considering how painful most mass-market bikes must be for women, I can sympathize.)
One disadvantage of recumbents is that they generally cost more than upright bikes because of their lower volume of sales. Most recumbent cyclists find that the extra cost is more than justified by having a bike that is so comfortable that it can be used for getting around, not just short recreational rides.

 People
are often surprised at the wide range of frame designs used in recumbents,
probably because standard bikes are all so similar. Recumbent design is
not standardized like upright bikes, so different brands and models of
bikes differ markedly. Some are long with full-sized wheels. Some use smaller
wheels to reduce the bike's length, and some even move the front wheel
back behind the cranks. The handlebars may be up in front of the rider
as on a standard bike, or projecting out to either side underneath the
seat, where your hands naturally wind up when your arms are relaxed. Some
designs work better in certain situations than others, and the variety
helps to insure that everyone can find something that's effective and comfortable
for them.
People
are often surprised at the wide range of frame designs used in recumbents,
probably because standard bikes are all so similar. Recumbent design is
not standardized like upright bikes, so different brands and models of
bikes differ markedly. Some are long with full-sized wheels. Some use smaller
wheels to reduce the bike's length, and some even move the front wheel
back behind the cranks. The handlebars may be up in front of the rider
as on a standard bike, or projecting out to either side underneath the
seat, where your hands naturally wind up when your arms are relaxed. Some
designs work better in certain situations than others, and the variety
helps to insure that everyone can find something that's effective and comfortable
for them.
Until recently, recumbents were hard to find, but many US bike shops have begun carrying inexpensive models like the BikeE. For more information, see:
http://www.bikeE.com
http://www.IHPVA.org
http://www.Recumbents.com
http://www.BikeRoute.com
There's also a magazine called Recumbent Cyclist News. They can be contacted at 206-630-7200, or P.O. Box 58755, Renton, WA 98058.
 Bike
Fit
Bike
Fit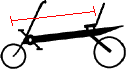 Recumbents
are usually available in several sizes, with the seat adjustable on the
frame or the frame itself adjusting to provide an exact fit. Because of
the extra pedalling power available from pushing against the seat back,
it's even more important to get this distance set correctly than on a standard
bike. Start with what seems to feel right, and go for some test rides,
paying careful attention to the fit. Shoe and pedal types and seat tilt-back
affect the measure, so you may have to do several fine adjustments.
Recumbents
are usually available in several sizes, with the seat adjustable on the
frame or the frame itself adjusting to provide an exact fit. Because of
the extra pedalling power available from pushing against the seat back,
it's even more important to get this distance set correctly than on a standard
bike. Start with what seems to feel right, and go for some test rides,
paying careful attention to the fit. Shoe and pedal types and seat tilt-back
affect the measure, so you may have to do several fine adjustments.
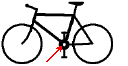
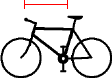 On
standard bikes, the distance between handlebars and saddle can strongly
affect your riding comfort. Some people need more space, some need less,
depending on the length of their spine and arms. The handlebars should
not be so far away that your arms are straight-a bend at the elbow is needed
for shock absorption. The handlebar height on most bikes can be adjusted
by moving the stem up and down, but be careful not to set it higher than
the safety line marked on the stem's side. Short stems are popular with
manufacturers because they are light, but they often leave the handlebars
too low for the rider. Taller stems and stem extensions can help here.
On
standard bikes, the distance between handlebars and saddle can strongly
affect your riding comfort. Some people need more space, some need less,
depending on the length of their spine and arms. The handlebars should
not be so far away that your arms are straight-a bend at the elbow is needed
for shock absorption. The handlebar height on most bikes can be adjusted
by moving the stem up and down, but be careful not to set it higher than
the safety line marked on the stem's side. Short stems are popular with
manufacturers because they are light, but they often leave the handlebars
too low for the rider. Taller stems and stem extensions can help here.
Hard handgrips are currently in fashion, but if you prefer comfort, Grab-On makes some nice foamy grips (MTN-1 and MTN-2) that help protect your hands from road shock and last well. Padded gloves help, too.
The saddle should be placed high enough that your knees are almost straight when the pedal is at the farthest point from the hip (slightly forward of the bottom position). Leaning from side to side when pedalling means that the saddle is too high. Usually people set the saddle too low to try to avoid the pain that poor saddles create. With a good saddle, that's not a problem. For comfort, start with the saddle level and try tipping the nose slightly down or up until it feels right. The saddle can also slide forward and back; farther forward, and your hands support less of your weight. Start with the saddle in the middle of its range, and use what feels right. When it's correct, you should be able to look down while pedalling and see that your thighs stay parallel to the top bar of the bike, and are not knees-in or knees-out. Grease the threads of the bolts that hold the saddle onto the seatpost, and make sure they're tight (the grease helps with that).
The structure is the bicycle frame. Most are made of steel or aluminum, and there's generally not a lot to worry about. You should probably check them for cracks every so often, though. Steel frames can rust, so they are painted. Even so, a good bike should be kept indoors, out of rain, dampness, and away from bike thieves.
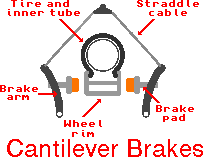
Bicycle brakes are elegant in their simplicity. There are two common styles: caliper and cantilever.
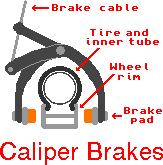
 Caliper
brakes are usually found on "road" bikes and department-store bikes. These
brakes are attached to a spot on the frame above the wheel, and reach down
like a pair of pliers to squeeze the brake pads onto the rim. Cantilever
brakes are two levers, one attached to the frame on either side of the
wheel, with a straddle cable running between them.
Caliper
brakes are usually found on "road" bikes and department-store bikes. These
brakes are attached to a spot on the frame above the wheel, and reach down
like a pair of pliers to squeeze the brake pads onto the rim. Cantilever
brakes are two levers, one attached to the frame on either side of the
wheel, with a straddle cable running between them.
Both types of brakes push a brake pad onto the rim. The pads that come with most bikes are mediocre; the best are made by a company called Mathauser, and the Mathauser economy pads actually cost less and last longer than most others. Sometimes the brakes "squeal" when used, and this can be fixed by adjusting them so that the part of the pad that is towards the front of the bike touches the rim first. This is called "toe-in." Another problem is having the pads set up so that they drag on the tire. This will very quickly wear through the tire sidewall, ruin it, and cause a flat, so don't do that.
Pedals have their own subtleties: there are right pedals and left pedals, usually marked with an "R" or "L" stamped into the end of the axle. The left pedal (from the rider's viewpoint) is threaded backwards, tightening into the crank by turning the axle counterclockwise.
To install a pedal, grease the threads on the pedal axle and hold it to the crank hole. Then turn the axle by hand as if you were unscrewing it. When there's a tiny click, the threads have seated and you can carefully turn it in the opposite direction to tighten. Don't force it, and make sure you've got the correct pedal for that side of the bike. When the pedal is screwed in all the way, tighten with a wrench. Always start pedals by hand to avoid cross-threading them and ruining the crank.
The drivetrain is the most complicated part of the bike, but it's still pretty simple. There are various adjustments and tweaks, but the chain is the key to the whole thing.
There are two easy ways to keeping your drivetrain working well, and they're related:
1. Keep the chain clean.
2. Keep the chain lubricated.
"How do I know if the chain needs to be cleaned?"
If it's coated with dirt, or squeaks, it needs cleaning. Plan on doing this every 100 to 400 miles of riding, or more often in wet weather. Done the way it's described below, it's quick and clean.
There are cleaning devices that work with the chain still on the bike, but they're messy and don't do a very good job. A better way is to put a US$5 Craig Superlink on the chain- then the chain can be removed without any tools. If your bike shop doesn't have them, ask. Superlinks sell so well they're hard to keep in stock, so you'll be doing them a favor. Contact information:
Craig Metalcraft, Inc., 4724 W. Rice St. Chicago IL 60651
312-921-3330, Fax: 312-921-0179
http://kato.theramp.net/craig/slmain.html
If your local bike shop doesn't want to get them for you, Wallingford Bike Parts has them.
The easiest and most effective chain cleaning method: get two wide-mouth glass jars with metal lids. Put the chain in one and add two cups of your favorite solvent (I use naptha from the hardware store, and always clean chains outside). Cap tightly, and shake gently for a while. A plastic jar won't break if you shake it hard, but some plastics can be softened or dissolved by oil-based solvents.
Let the jar stand for a few minutes, and pour the solvent off into the other jar. Add a tiny bit of clean solvent to the chain, cap, and shake to rinse. Take the chain out and let it dry. Pour any leftover solvent into the full jar and wipe out the dirt in the bottom of the empty jar. By the time you're ready to clean the chain again, the dirt will have settled out, and you can put the chain in the empty jar and pour the clean solvent off the top of the other one. Clean out that jar, and keep alternating. This gets the maximum use out of the solvent with the least amount of environmental damage.
The chain is now clean and needs to be oiled. Don't use WD-40 or 3-In-1 oil- neither work well for chains. Almost any other oil will work, and many people use motor oil or chainsaw bar oil. Waxy "dry" lubricants are also popular. My favorite, Boeshield T-9, can be found at the bike shop, and is somewhat pricier than general-purpose oils. However, it works very well and is available in a squeeze tube instead of a spray can, which makes application more accurate and less wasteful.
Whatever oil you choose, apply it to the chain so it seeps inside the rollers. Afterwards, wipe the excess off of the outside of the chain. The very thin coat of oil that remains on the outside of the chain will be adequate to prevent rust, and more will just pick up dirt.
Before putting the oiled chain back on the bike, wipe the crud off the plastic pulleys on the derailer (gear-changer) on the back wheel, the front cogs (chainrings), and the rear cogs (a stiff plastic-bristle brush works well). When the chain is kept clean, they won't get very dirty. Don't forget to clean the two pieces of the Craig Superlink (a rag or paper towel works) and oil them when they are reinstalled.
Chains will last a long time when treated well. If they are dirty, they'll wear out quickly and take the rest of the drivetrain with them. That can be expensive to fix. To see if a chain is worn out, hold a ruler up to it. The pins on the sides of the chain should line up with the ends of the ruler. A new chain will line up perfectly on the centers of the pins- as the chain pins wear, the chain will get longer. If the section is more than 1/16" to 1/8" longer than a one-foot ruler, the chain should be replaced. If a worn chain has been ridden much, expect to replace the rear cogs as well, because a new chain will "skip" over the teeth when you pedal hard.
By now the glue will have dried on the tube with the hole. Peel the foil off the patch and stick it on. The plastic covering on the back side of the patch will be easier to remove if you leave it for a while. Burnish the patch down with your thumb or something smooth like a tire lever. Open the valve and squeeze any excess air from the tube, which is now the spare tube.
If there is a visible hole in the tire, some type of cloth or similar woven material placed between the tube and tire may keep the tube inside long enough to make it home (I've used dollar bills for this, but they're not really very tear-proof). A short strip of duct tape can be rolled into a flattened cylinder and kept with the spare tube, and may be useful for other impromptu repairs.
Cycling doesn't always take longer than motorized forms of transport. In some high-traffic areas, it can actually be quicker than trying to pilot a car through crowded streets or waiting for a bus. Even in urban areas with public transportation, lots of people still ride bikes to get around. Sometimes it's a cost issue: a bike is a one-time expense, and costs little to keep running. Sometimes it's a time or control issue: a cyclist controls when and where they travel, without having to wait for a bus or train. And of course, some people ride bikes just because it's more fun than sitting in a bus.
Cars have hidden costs that aren't generally shared by bikes: insurance, licensing, depreciation, and yearly inspections and tuneups. For the price of merely keeping a car in the driveway, you can generally buy a pretty good bike outright. The bike has a lot lower cost to everybody else, too, with less pollution, less wear on the roads, and less space needed for parking. Some companies reward or reimburse employees who don't need a valuable parking space.
Even if you use a bike only once in a while, it can still add up to a significant savings for you and others. The short trips that are so commonly made in cars are an ideal place to start substituting bike travel.
You can spend a lot of money on fancy sports drinks and food bars, or just use water and fruit or cookies (fig bars are a favorite). For long rides, juice that has been heavily diluted with water (2:1 or 3:1) tastes awful but works well.
Use sunblock. SPF 30 or 45 is not too much. The Banana Boat brand seems to be non-irritating for most people. Don't forget the back of your neck, your earlobes, and pretty much any exposed skin.
Be kind to your knees: spin quickly with low pressure (high RPM, low torque). If it becomes difficult to pedal, shift to a lower gear. You might need to stop when going up hills, and there's nothing wrong with that. If some pansy driving past in a car makes a noise, just remind yourself that they have an expensive, heavy, polluting engine to pull them along, and you're the one who's tough enough to ride it on a bike, even if you do have to stop for a bit.
If most of your riding is with a mountain bike on paved streets and roads, mostly-smooth tires are available that will make riding smoother and easier, and they're still adequate for most off-road uses.
Motorists often "don't see" cyclists. It's not that they're not looking, it's just that mostly they're only looking for other cars. Pretend you're invisible, and allow for that. When riding past parked cars, stay far enough away so that you won't be hit by a suddenly-opened door. At stop lights and intersections, try to make eye contact with motorists- it's more effective than bright clothing or flags at letting them know you're there. Signal your turns by extending the appropriate arm and pointing with your index finger. John Forester's Effective Cycling book is often recommended for a complete source on bicycle safety.
Vision
Small mirrors on the end of the handlebars or attached to a helmet or eyeglasses make cars and other cyclists behind you much easier to see, and don't require twisting your neck or shoulders to use. The slight eye movement is quick and encourages keeping track of traffic around you.
Passing
In general, act like a car. Ride on the same side of the road as cars, not against traffic, and pass other cyclists or pedestrians as if you were a car. Announce that you're passing before you get there- the standard in the US is a call of "On your left!" followed by the cyclist passing on the left. Shouted in a friendly tone of voice and early enough to give them time to react, pedestrians appreciate this. Be sure and give them plenty of time, as they may not know what you mean, and a small percentage will move in the wrong direction. I still try to pass on the proper side if there's room. Watch out for people with personal stereos- they won't hear your call, and your sudden appearance will startle or frighten them. Sometimes they may jump directly into your path. Give them lots of room.
Road Obstacles
Gravel roads usually require a speed reduction, but they're generally ridable. Watch for loose gravel or sand, especially when turning. They can allow the tire to slide toward the outside of the turn.
On paved roads, loose objects on the surface can act like ball bearings, causing the front wheel to slide out during turns, or either wheel to skid while braking. Sand, gravel, sticks, water, oil, ice, or other obstacles can all cause this. It's best to avoid them, but that's not always possible. Reduce speed, have your feet free of clips and ready to touch down, and keep the front wheel straight when it's on any kind of tricky surface. If there's a patch of gravel midway through a turn, it helps to straighten out while going over that patch, then going back to the turn afterwards.
Paved roads can also have "snake tracks." These are long cracks that go lengthwise with the road. Even after repair crews have filled them with tar, they can suck in the front tire and force it to follow the crack, with undesirable results.
Iron storm drain grates are sometimes built with wide slots that can trap a bike tire. When wet, metal objects like these grates or railroad tracks become slick as ice. Avoid if at all possible, and walk the bike if you have to go over them when they're wet.
Don't stare at any kind of road obstacle, because the bike will tend to go where you're looking. If you're heading toward something nasty, force yourself to look at the path you'd rather take. Practice of this technique will pay off.
Helmets
The decision of whether or not to wear a helmet is up to you and possibly your local laws- I wear one, and it provides a nice place for a visor to keep the sun out of my eyes. If you wear one, make sure to read the instructions and set it up properly. A helmet worn tipped back like a ski cap may look stylish, but most are made to be worn level from front to back, and provide the best protection when set up this way. Make sure the straps are not so loose that the helmet will come off in an accident.
Dealing With Dogs
Dogs instinctively chase running animals, and some poorly-trained ones find the spinning, gazelle-like legs of a cyclist very tempting. Most dogs can be scared off by a squirt from your water bottle. Others will respond to a shouted "No! Go home!" command. Being chased by a dog can be very dangerous- while trying to avoid the dog, you can swerve into oncoming traffic. Stopping and putting the bike between you and the dog is usually a better alternative than trying to outrun them. If a dog bothers you repeatedly, talk to the owner. This is for the dog's safety as well as yours, since many dogs are hit by cars while running to attack a cyclist. If the owner refuses to believe it's a problem, consider carrying pepper spray. A blast of this stuff in the face is a one-shot training exercise for most dogs, and causes no permanent injury (unlike ammonia, which can blind them). It's far kinder to the dog than letting them get run over by a car, and will help keep other people safer.
Away from home, look for solid objects which can used as anchors: trees, telephone or light poles, solid fences. The standard "kiddy" bike racks can be used, but put the rear wheel into the rack instead of the front wheel.
Having found a safe place, preferably one with lots of people passing by, use a good lock to secure the bike. If the bike has quick-release wheels, make sure the lock is securing both- you may have to take the front wheel off and place it parallel to the rear wheel for the lock to reach through both. The lock should pass through the bike frame so a thief can't just remove the wheels and take the frame. Sheldon Brown has an article on lock strategies.
Bike shops sell special quick-release skewer replacements that require a wrench to remove the wheel, or the hollow axle can be tapped to accept bolts at the ends.
If the worst should happen and some vermin steals your bike, many homeowner or renter insurance policies cover stolen bikes, even if the bike was not at your home when stolen. Ask your insurance agent specifically what your policy covers, and keep receipts to prove the value of the bike and any add-ons. Of course, the best insurance is to do everything you can to prevent a theft in the first place.
 The
simplest way to convert a bicycle from a recreational toy to a work vehicle
is to add a rear rack. These give you a place to strap items onto the bike
and safely carry lots of things. Onto the sides of a rack you can attach
panniers (cloth bags like a backpack) or the older-style but still very
effective wire baskets. Clunky items can be strapped to the top of the
rack. Long and thin things can be tied to the top tube of the bike- this
works well for things like brooms, fishing poles, and maybe even a board
or two.
The
simplest way to convert a bicycle from a recreational toy to a work vehicle
is to add a rear rack. These give you a place to strap items onto the bike
and safely carry lots of things. Onto the sides of a rack you can attach
panniers (cloth bags like a backpack) or the older-style but still very
effective wire baskets. Clunky items can be strapped to the top of the
rack. Long and thin things can be tied to the top tube of the bike- this
works well for things like brooms, fishing poles, and maybe even a board
or two.
Racks can also be added to the front of a bike, and carry the same type of panniers as the rear. Be careful when riding a fully-loaded bike, because steering and braking performance can change drastically with a heavy load.
Lots of people use backpacks for carrying things. They work, but can be uncomfortable, and heavy loads make the rider top-heavy. Most people prefer racks and panniers for longer rides. Either solution is much better than carrying bags hanging from the handlebars, which tend to sway in time with your pedalling and get in the way of your knees or make reaching the brakes difficult.
A cheap way to carry a small amount of stuff is to add a bag that hangs underneath the saddle, or straps to the top of the stem and handlebars. While small, these can hold important things like a tool kit, spare tube, and your wallet and keys.
For hauling larger loads, consider a bike trailer. If the "load" is one or more kids, these are far safer than the kiddy seats that go over the rear wheel of a bike. Trailers can be very effective for hauling moderate to large loads. Fresh Aire Trailer Works makes trailers that they use to routinely haul huge loads. Even inexpensive cargo-only trailers like the Bykaboose can handle 80 pounds of newspapers, bottles, or cardboard bound for the recycling center, or several bags of groceries. There's a good selection of bike trailer links at BikeRoute.
There's also a newer option for bringing kids along: the trailercycle. It's just the back part of a kid's bike, which attaches to the back of a normal bike, giving you a tandem. The kid has a separate drivetrain, so they can pedal at their own speed, or just coast along. Models are available for one or even two kids. See http://www.sheldonbrown.com/trailrcy.html and http://burley.com/piccolo.html.
Plastic grocery-store bags are handy for carrying this kind of thing. They'll keep cloth items like baseball caps, towels, or pillows from shedding dirt onto your other cargo, or the other way around. When you find a broken bottle or some nails, a plastic bag will carry the them so they aren't there the next time you go past. These bags are practically weightless and can be compressed into a very small space, even stuffed inside the handlebars, with a bit left protruding past the end cap so you can get them out again. If you get cold, they can even be used to line your clothing.
Tools and hardware are commonly found along the road, everything from screwdrivers and hose clamps to jigsaw blades and electrical conduit. Most don't even need cleanup.
Finds made of cloth can be cleaned by soaking in a strong mixture of detergent and hot water, and adding some chlorine bleach is not a bad idea. Many of the cloth items found seem to be spotless, just dropped out of a car window.
Sometimes you'll find money, usually pennies or nickels. I stop even for pennies, not just for an excuse to rest, but because there are often several in a cluster, and besides, why not? A penny seems to show up on the road an average of every twenty miles or less.
A bicycle used in wet environments needs more frequent chain and bearing lubrication, and a stickier chain oil is appropriate. Chainsaw bar oil or Phil Wood's Tenacious Oil works well. Remember that oiling a dirty chain will cause heavy wear by washing grit inside the rollers, so always clean it first.
Cold hands and feet often mean that you haven't dressed your head and chest warmly enough. The body will limit blood flow to the extremities in an attempt to keep the core temperature up. Polyester wicking underwear is very inexpensive and useful as a first layer for cold weather, even if you aren't cycling. Glove and sock liners of the same material will help keep your hands and feet dry and warm. Three layers work fairly well for moderately cold temperatures: the polyester underwear, a fuzzy warmth layer, and a wind-proof outer layer to hold in the heat.
So you can apply power at different rates for different terrain.
Front Gears
Most bikes have two or three front gears, called chainrings. The shifter that controls them is the one on the left side of the handlebars. It's easiest to think of these chainrings as providing multiple ranges of gearing: the smaller chainrings are for lower gearing, like when you're climbing steep obstacles, or going very slowly through rough terrain. The larger chainrings are used when you are going faster, either downhill or on flat country.
Rear Gears
The set of gears on the back wheel is called a freewheel or freehub, and each individual gear is called a cog. There can be anywhere from five to nine of these cogs. The largest cog provides the lowest gear and each smaller cog provides a slightly higher gear than the one before. When you start off from a stop, you should start with the chain on the largest cog in back. As you speed up, you'll shift "up" to the next smaller cog. With the front gears providing a coarse adjustment, the back gears provide a fine tuning.
Shifting
The chain is shifted from one gear to another by a derailer. This device actually pushes (derails) the chain from one gear over to the next. The only real trick to smooth shifting is to stop applying pressure to the pedals but keep spinning them. This lets the chain relax a bit and makes it easier to slip over to the next gear.
Avoid chain scrub. This is when the front derailer is actually rubbing against the chain. You'll hear it, and when you do, it tells you to move the front derailer a little bit so it doesn't rub.
There are two gear combinations you shouldn't use: the smallest in front along with the smallest in back, and the largest in front along with the largest in back. These two combinations have the chain going at an extreme angle from the front to the back, and are not good for the chain or the gears. You'll find that you don't need these combinations, since the gearing they provide can be more easily had with one of the other combinations.
Pedalling
The correct way to pedal is not to alternately push, but to spin the pedals in circles. Toe clips, straps called PowerGrips, or special snap-on shoes make this possible, by holding your feet to the pedals (it's still easy to remove your foot from the pedal when needed). Keep as high a cadence as you can manage comfortably- at least 60 RPM if possible. This would be each pedal making a complete circle in one second. Try the "one-thousand-one" counting to time it. If you can't keep up that rate, it means you need to shift to a lower gear (or you're riding up a hill in your lowest gear-sometimes it just can't be avoided).
Going For A Ride
At a stop, the chain is on the middle or smaller chainring in front and the largest cog in back. You push off and start riding. As the bike speeds up a bit, you find that you can't spin fast enough to put any pressure on the pedals, so you shift the rear derailer up one gear (to the next smaller cog). The bike starts going even faster, and you shift up to the next gear. This continues until you're in a comfortably high gear, or you've shifted up onto the smallest cog on the freewheel (the highest you can get on the freewheel).
You come to the bottom of a steep hill, and the bike's momentum carries it a little way up the base. Gravity is taking effect, and the pedalling has become too difficult. You need to shift down to be able to apply power to the rear wheel more slowly, so you shift to the next larger cog on the back derailer (often, you'll need to shift down two or three gears on a hill, because the bike will still be slowing down while you're shifting).
The hill is really steep, and the bike slows down even more. The chain has been shifted onto the largest cog, and pushing the pedals is still too hard and too slow. It's time to take advantage of the lower range of gears provided by the smaller chainring. You give the pedals a hard push to be able to coast for a little bit, then ease up on the pressure so the shifting will be easier, and shift to the smallest chainring in front. Right now, you're using the lowest gear your bike has, the small chainring in front and the largest cog in back. This lowest gear may not be low enough for you to make it over the hill until you've built up some muscle. Don't be afraid to stop and take a rest.
Once you get to the top of the hill, you can shift to the middle or larger chainring to get a high enough gear for going down the other side.
There is some overlap between the ranges, so sometimes you'll have to double-shift, changing both front and back gears in quick succession. This is a matter of practice, as is smooth shifting overall. Don't worry about it, take your time, and go ride!
http://draco.acs.uci.edu/rbfaq/FAQ/index.html
Sheldon Brown's informative, practical, and excellent articles on many aspects of bicycle repair, tuning, and other interesting stuff:
http://www.sheldonbrown.com/harris_articles.html
Stephen Ciccarelli's superb Cyberider page, with a huge, searchable archive of articles from lots of people who really ride bikes:
Cycling is unique among sports: the more you ride, the younger you get!